Building a Unix-shell in Rust - Part 1
Throughout this year and last one, I haven’t stopped hearing how amazing Rust is and how awesome its developer experience is. In addition, Rust was ranked as one of the most loved programming languages in 2023. So, it was time to learn it and see why people praise it so much.
To do that, I decided to build a Unix shell in Rust. It seems like a good starter project, and I use the terminal and shell commands a lot in my day-to-day tasks. It seemed like the perfect idea—not only to learn the language but also to understand how a shell works and what makes them so useful.
What’s a Shell?
Before we dive into development, it’s important to know what a shell is. There’s often confusion among people when differentiating between a Shell, Terminal, and Prompt.
Here’s a brief explanation of each concept:
- Terminal: The terminal emulator (often just called terminal) is “the window” that displays the characters you type and sends them to the shell. It also shows the shell’s output in the window.
- Shell: A shell is a program that allows you to control your computer more easily than manually doing it. It’s responsible for executing the commands you type.
- Prompt: The prompt is just the line where you write the instructions for the shell. It’s what you can mainly customize to your liking via third-party scripts, such as oh-my-posh, oh-my-zsh, etc.
Some examples of Unix shells, like the kind we’re making, are:
- Bourne-shell (sh)
- bash
- zsh
- fish
Or the Windows-specific shells, which are confusingly both the shell and terminal emulator:
- Command Prompt (cmd)
- PowerShell
Examples of terminal emulators:
- xterm
- rxvt
- Alacritty (which is also written in Rust)
- iTerm
- Terminal.app
- Command Prompt (cmd)
- PowerShell
The goal is to write a shell similar to bash, as it’s the one I’ve used the most. I’ve also used zsh, but not as extensively as bash.
How Does a Shell Work?
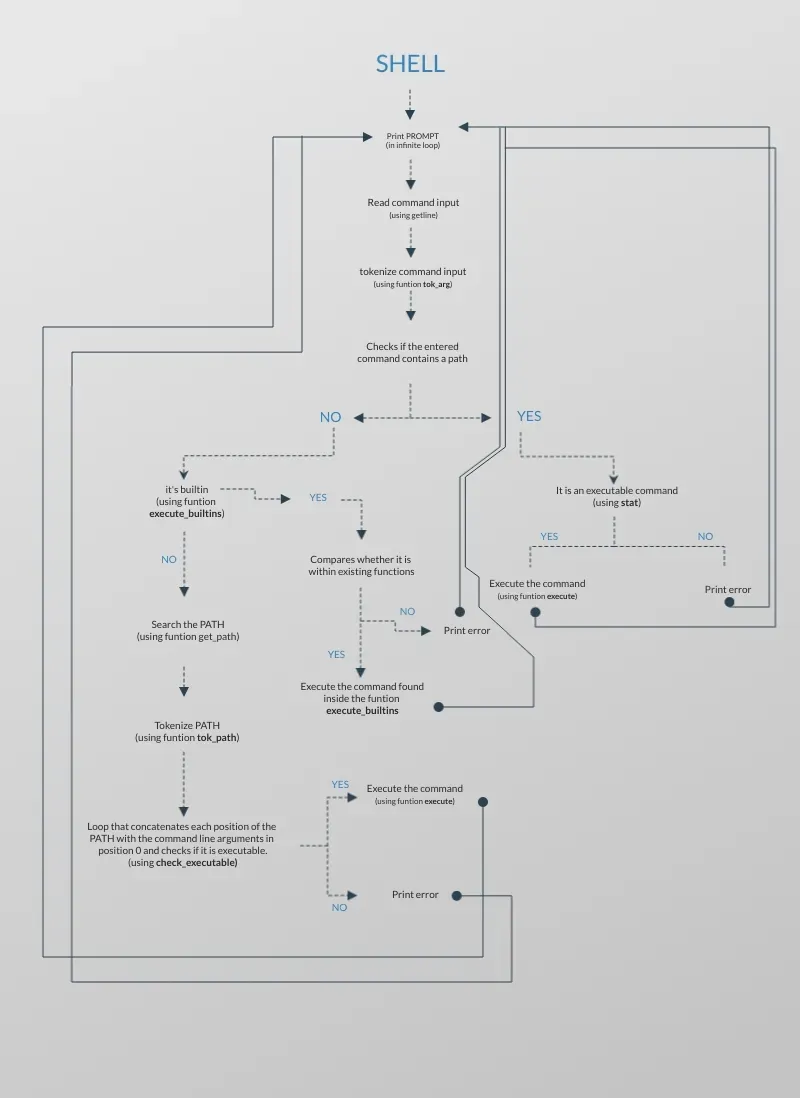
So now that we know what a shell is, how does it work? Well, a shell uses what is called a REPL (Read-Eval-Print-Loop). This means you first type a command in the prompt, which is usually just a dollar sign ($). Then you hit enter to translate the command into an action. The shell executes it, and the output prints to the screen. This loop repeats forever, or until the user closes the terminal.
Here is a diagram that explains more extensively what happens in the shell.
Lets see this in action with an example using ls:
-
First, we type the command we want to execute, in this case,
ls:/ ❯ ls -
We hit enter, and the shell executes the command and its output is displayed:
/ ❯ ls bin dev home lib lib64 lost+found mnt proc run snap sys usr boot etc init lib32 libx32 media opt root sbin srv tmp var -
At the end of the output, the loop repeats by letting you type another command:
/ ❯ ls
bin   dev  home  lib    lib64   lost+found  mnt  proc  run   snap  sys  usr
boot  etc  init  lib32  libx32  media       opt  root  sbin  srv   tmp  var
/ ❯
Architecture of Our Shell
Before starting to write code, it’s necessary to have everything well organized to be as efficient as possible when programming and to have a general view of the product and how it will be done.
Execute Initial Scripts and Shell Configurations
Before starting to read user input, the shell has to read the configuration file. This is done to customize the shell to each user’s preferences.
Although this step will be done later in the series, once all the base of the shell has been established, it is important to keep in mind that customization is crucial.
Read User Input
After the initial configuration, we start the general loop by reading the user input. Most shells print a symbol to signal to the user that they can input a command.
Next, we need to analyze the user input to determine if it is a built-in command or an external one.
The difference between them is simple: a built-in command is directly handled by the shell itself, instead of executing an external process. In other words, it’s a function call within the shell’s code. An external command is either a binary in one of the directories in your PATH or located in a filesystem path (relative or absolute).
| Some Built-in Commands | Some External Commands |
|---|---|
cd, help, echo | grep, wget, curl |
The most popular example of a built-in command is cd. The reason it must be built-in is that an external program can’t change the environment of the current working directory, so it must be changed by the shell itself. A more in-depth explanation can be found in this link.
Then We Execute
When we use a command that calls a built-in, we simply pass the arguments to the function and return to the start of the loop when it completes.
And When We Call an Executable?
We need to make a fork syscall, that is, create a new process for the executable to run in, so it can have its own memory space and manage its interactions with the operating system (The shell is still the parent process).
Then We Process
This is when we cause side effects to the system.
We want to provide feedback to the user to let them know the results of this process. To keep this simple, we will only consider returning text to the user, as we are providing commands as text.
Our shell process has at least 3 file descriptors for passing input or receiving output: Stdin, Stdout, and Stderr.
After the process is complete, any output should be printed to the screen, via stdout or stderr.
Lastly, We Loop
Control returns to the user. The default user prompt prints as a visual cue (along with the typical blinking cursor), and we should be able to enter another command.
Time to Code
Now that we have set the record straight on how the shell is going to work, we can start coding the basics. But that will be explained in the next post. See you next time!